Welcome to HTML! This section will take you on an exciting ride through basic learning about HTML, its history, and the role that it plays in web development. You’ll know what HTML is, what its evolution has been by the end of this section, and how you should set up your environment for creating your own web pages. Let’s get started!
1.1 What is HTML?
HTML is an abbreviation for Hypertext Markup Language. It represents the most used core technology during the development and designing of web pages. It gives the basic wireframing for web content such as text, images, and other media. One good way to think about the relationship between HTML, CSS, and images might be to compare them to building a house: the blueprint is the HTML, the decoration is the CSS, and the furniture is the images and other media.
HTML defines elements with a system of tags. Tags are enclosed in angle brackets (`< >`) and they generally come in pairs: opening tag and closing tag. The `<p>` tag for instance defines a paragraph and is closed with `</p>`.
Basic Structure Example in HTML:
Let’s look in detail at a minimal HTML document to understand what makes an HTML document:
<!DOCTYPE html>
<html>
  <head>
     <title>My First Web Page</title>
  </head>
  <body>
    <h1>Hello, World!</h1>
    <p>This is a paragraph of text on my first web page.</p>
  </body>
</html>
Above example describes,
- <!DOCTYPE html>: This is the declaration of the document type. It tells the browser that this document is an HTML5 document.
- <html>: This is called the root element. It contains all the other elements within it.
- <head>: This carries information about the HTML document, document title, and links to stylesheets or scripts.
- <title>: This defines the title that is to be set on the title bar of the window of the browser.
- <body>: This is the document content tag that needs to appear in a window. It includes everything from the document title down through headings, paragraphs, images, links, lists, tables, etc.
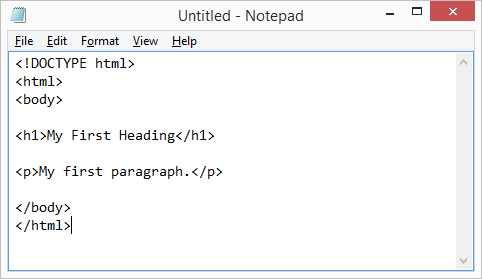
Now open a new document in your text editor and paste the sample code into it. Save the file and name it index.html. Open the file in your browser, and you should now see a heading and paragraph visible upon loading into the browser. For an exercise now change some of the content by replacing the text between the `<h1>` and `<p>` tags to quickly see how your edits can change the page.
Quiz Time:
1.2 History of HTML
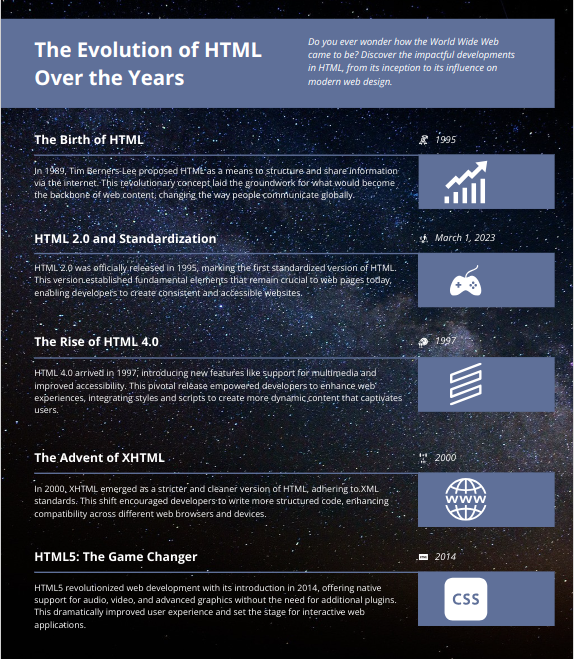
HTML itself has an immense history, which reflects the history of the web itself. Invented by Tim Berners-Lee in 1991, the main idea of the invention of HTML was to facilitate document sharing over the Internet. Over the years, this earliest version of HTML has seen a number of enhancements. These enhancements have resulted in several versions and revisions included in it.
History of HTML:
- 1991: HTML 1.0 was released, featuring simple tags for text, links, and images. Although this first version was at the root of all others, it was pretty limited.
- 1995: The specification HTML 2.0 was developed, continuing to provide support for forms with the capability to interact with a web page through text input fields, buttons, and controls.
- 1997: HTML 3.2 was released to the public, adding tables and styles to the more complex formatting and presentation features.
- 1999: The release of HTML 4.01 further enhanced advanced format and presentation features by incorporating Cascading Style Sheets and increased support for scripting languages, such as JavaScript.
- 2014: The standard of HTML5 is developed. This version includes new elements that define the semantic structure of a web page, together with support for multimedia like
<video>and<audio>, including addition of APIs for web applications.
Visual Aid:
Quiz Time:
Discussion Prompt:
"Reflect on why HTML has remained an important factor in the development of the web for well over two decades. Why do you believe it has continued to be relevant?"
1.3 HTML Versions
HTML has passed through different versions, with added features and improvements. Understanding these versions makes one appreciate how web technology has changed and is continuously changing the face of web development.
Overview of Versions of HTML:
- HTML 1.0: This was the very first version used to provide basic formatting of text and linking. It gave the basic blocks that were needed to start content creation on the web.
- HTML 2.0: Slightly more complex with the introduction of forms, which are supposed to interact with the user, and tables for information organization.
- HTML 3.2: It was more advanced compared to its earlier version with facilities like tables, styles, and scripting. This enhanced version allowed for more presents as compared to earlier versions of HTML.
- HTML 4.01: An important version, featuring many changes that introduced CSS to handle the presentation style and JavaScript for the content to be dynamical. It introduced new structural elements, and it also improved support for Web standards.
- HTML5: The latest available version is HTML5, which brought along new semantic elements like
<header>,<footer>,<section>, and<article>. It also supports different multimedia elements such as<video>and<audio>, and it gives several APIs to build complicated web applications.
Comparison Chart
| Html Version | Year | Major Features |
| HTML 1.0 | 1991 | Basic text and links |
| HTML 2.0 | 1995 | Forms, Tables |
| HTML 3.2 | 1997 | Enhanced layout and styes |
| HTML 4.01 | 1999 | CSS integration, Scripting |
| HTML5 | 2014 | Semantic elements, Multimedia, APIs |
Interactive Quiz:
Compare tags across various HTML versions. For instance, HTML 3.2 used the <font> tag for text styling. HTML5 recommends the use of CSS. Locate any tags that have been deprecated or replaced with more updated standards.
Quiz Time:
1.4 How the Web Works?
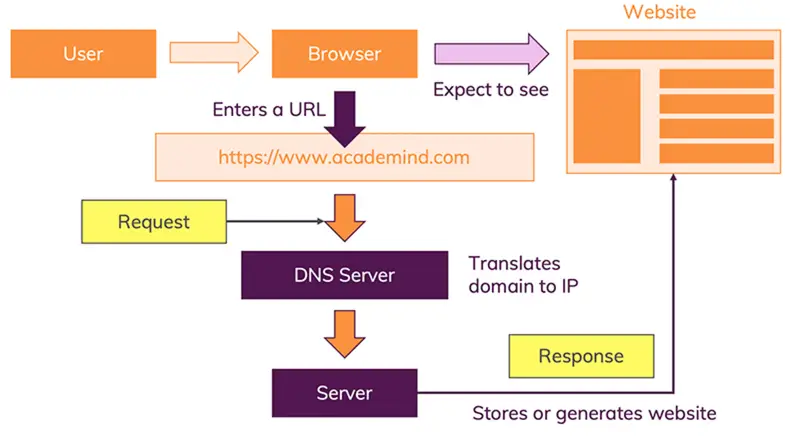
In this regard, to effectively use HTML, a person has to know how the web works. The web works on a client-server model. Your web browser's the client, requesting resources from a web server.
Explanation:
- Request: In your browser, when you enter an URL and press Enter, it sends an HTTP request to a web server.
- The server processes this request and returns the requested HTML document.
- Rendering is the process where the browser will take that document and render it in the web page. That is to say, the browser interprets the code in HTML and presents it into visible form.
Visual Diagram:
Self Check:
Use developer tools of the browser for inspecting network requests. For the sake of this lab open Developer tools by using F12 or Ctrl + Shift + I, switch to "Network" tab and refresh this page. Note a couple of things about each HTTP request and response including but not limited to the status code and content type.
Quiz Time
Hands-On Activity:
Send different kind of HTTP requests using for example Postman or curl. Notice that by using different methods changes what responds from the server.
1.5 Setting Up the Development Environment
Setup your development environment. That is, you are going to install and configure a few tools so that the job of writing and testing HTML code goes smooth. Step-by-Step Setup First things first, choose a code editor: You will be writing your HTML code in it. The most popular ones are VSCode, Sublime Text, and Atom. Such editors give you syntax highlighting, code completion, and lots of other conveniences useful to a coder.
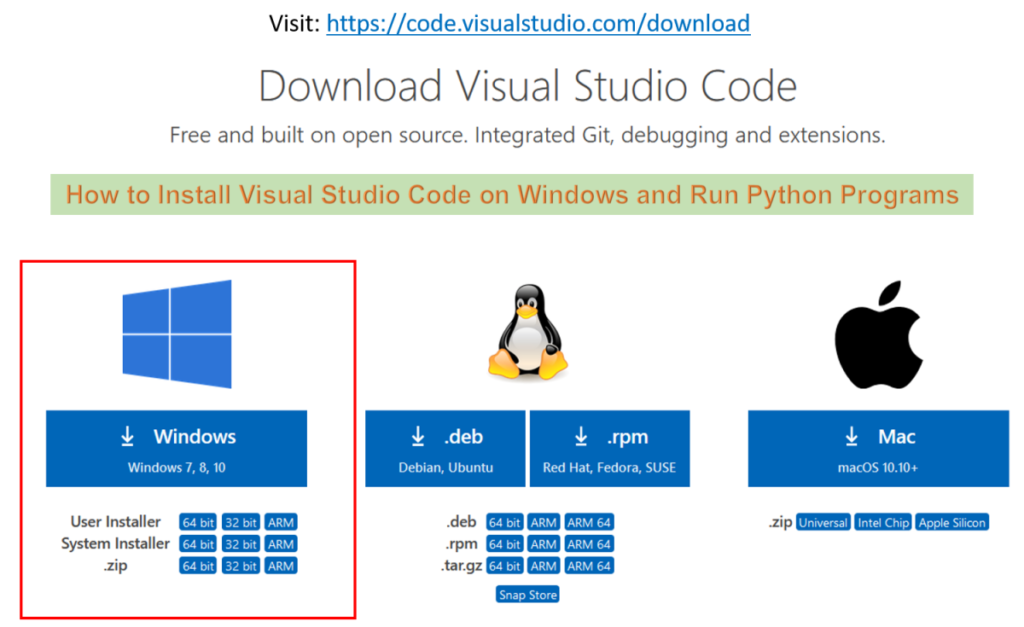
- Setting up Visual Studio Code:
- Go to: https://code.visualstudio.com/download
- Click the version compatible with your operating system
- Follow the installation steps.
2. Web Browser Installation:
- You need a recent version of any web browser to test your HTML files. Google Chrome and Mozilla Firefox are recommended since developer tools can be used to debug them.
- Browser Developer Tools
- Chrome developer tools can be opened by pressing `F12`, or by pressing `Ctrl+Shift+I`. For Firefox, it's again `F12` or `Ctrl+Shift+I`.
Screenshot Walkthrough:
- Install VSCode and Then Open:
- Create a New HTML File:
Try Yourself:
<!DOCTYPE html>
<html>
  <head>
    <title>My First Web Page</title>
  </head>
  <body>
<h1>Hello, World!</h1>
    <p>This is a paragraph of text on my first web page.</p>
  </body>
</html>
Now open the above file in your browser and play your heart out with this document. Change the text, add more elements, heading, list, image, and whatever your imagination goes on to. Observe every time you modify the text and load your browser, your document changes accordingly.
Quiz Time:
1.6 Basic Structure of an HTML Document
There is a basic structure for an HTML document, which defines how content becomes available within a web page. Knowing this structure is important to guide an individual in the construction of a valid document in HTML.
HTML Document Structure:
- <!DOCTYPE html>: Instructs the browser to expect an HTML5 document. It puts the document into standards-compliant mode.
- <html>: This is the root element of the document, and it wraps all content on the page. All other HTML elements are contained within this element.
- <head>: It is an element that contains information about the document that includes the title of the document, character encoding, and links to stylesheets or scripts.
- <title>: Sets the title to appear in the tab or the title bar of a browser.
- <body>: Here goes the HTML content of the web page that the users will directly interact with. Such content includes but is not limited to headings, paragraphs, images, links, and more.
Annotated Example:
Below is a more complete example of an HTML document. This time it is annotated:
<!DOCTYPE html> <!-- declares this document as an HTML5 document -->
<html>
<head>
    <title>My Updated Web Page</title> <!-- title of the page -->
</head>
<body>
<h1>Hello, World!</h1> <!-- Main heading -->
    <p>This is a paragraph of text on my updated web page.</p> <!-- Paragraph -->
    <p>This is a second paragraph with added substance to the page.</p> <!-- Another paragraph -->
  </body>
</html>
Interactive Activity:
Based on this example code, extend this code further by adding an image and a link:
<!DOCTYPE html>
<html>
  <head>
My Revised Webpage
</head>
<body>
<h1>Hello, World!</h1>
<p>This is a paragraph of text on my revised web page.</p>
<p>This is a second paragraph with added text.</p>
<img src="https://example.com/image.jpg" alt="Sample Image"> <!-- Add an image -->
<a href="https://www.example.com">Visit Example.com</a> <!-- Add a link -->
</body>
</html>
Hands-On Activity:
Create a personal web page that can describe your favorite hobby. It shall have at most a heading, a paragraph about the hobby, an image related to the hobby, and an address to a website that will tell others about the hobby. For example:
<!DOCTYPE html>
<html>
  <head>
    <title>My Favorite Hobby</title>
  </head>
  <body>
    <h1>My Favorite Hobby: Hiking</h1>
Hiking is a very good way of touring nature and keeping fit. I enjoy being on new trails and in the open air.
    <img src="https://example.com/hiking.jpg" alt="Hiking Image">
    <a href="https://www.hikingtrails.com">Learn more about hiking trails</a>
  </body>
</html>
Quiz Time:
1.7 Common HTML Tags and Their Uses
HTML is designed to have plenty of tags with which to develop various types of content within a web page. Knowing these will help you develop visually appealing web pages that are well-structured.
Common HTML Tags:
- Headings:
<h1>through<h6>tags are used for headings. - Paragraphs: The
<p>tag defines a paragraph of text. - Links: The
<a>tag creates hyperlinks to other web pages or resources. - Images: The
<img>tag is used to insert images. The image source can be specified using the src attribute; alternative text may be provided using the alt attribute. - Lists: HTML provides both ordered lists
<ol>and unordered lists<ul>, whose items are specified using<li>tags.
Elaborative Examples:
Headings and Paragraphs:
<h1>Main Heading</h1>
<h2>Subheading</h2>
<p>This is a paragraph of text.</p>
Links and Images:
<a href="https://www.example.com">Visit Example.com</a>
<img src="https://example.com/image.jpg" alt="Sample Image">
Lists:
<h2>Ordered List:</h2>
<ol>
  <li>First item</li>
  <li>Second item</li>
</ol>

<h2>Unordered List:</h2>
<ul>
  <li>First item</li>
  <li>Second item</li>
</ul>
Interactive Activity:
Create an HTML page that includes all the common tags we have covered. Employ headings, paragraphs, links, images, and lists in it. For example:
<!DOCTYPE html>
<html>
  <head>
    <title>Common HTML Tags</title>
  </head>
  <body>
<h1>Common HTML Tags</h1>
    <p>In the example below, different HTML tags will be used.</p>
    <h2>Links:</h2>
    <a href="https://www.example.com">Visit Example.com</a>
    <h2>Images:</h2>
    <img src="https://example.com/image.jpg" alt="Sample Image">
    <h2>Lists:</h2>
    <h3>Ordered List:</h3>
    <ol>
      <li>First item</li>
      <li>Second item</li>
</ol>
    <h3>Unordered List:
    </h3>
    <ul>
      <li>First item</li>
      <li>Second item</li>
    </ul>
  </body>
</html>
Quiz Time:
1.8 HTML Attributes
Attributes carry extra information about attributes in HTML. They are always included in the HTML tags and control different kinds of an element's behavior or appearance.
Common HTML Attributes:
- href: This is an attribute that shows the URL to link; it comes under `<a>` tag.
- src: This shows the source of an image; it comes under
<img>tag. - alt: This provides alternative text for an image; it comes under
<img> - id: Assigns a unique identifier to an element. Useful for styling and scripting.
- class: Assigns one or more class names to an element. While deferred to Week 2, this is useful when you want to style multiple elements the same, but not all of a certain type.
Example Usage:
<a href="https://www.example.com" target="_blank">Visit Example.com</a>
<img src="https://example.com” alt=”image”>
<p id=”para” class=”firstPara”>This is a paragraph</p>
Modify attributes of HTML tags on your page. For example, you could add a target attribute to a link so that when a link is clicked it opens in a tab. You might also add width and height attributes to an image to define size.
Quiz Time:
1.9 Validating HTML
Validating your HTML code allows it to meet web standards and best practices. Validated HTML is more likely to render correctly across several browsers and devices.
Why Validation Matters:
- Cross Browser Compatibility: Valid HTML will be less prone to problems in multiple web browsers.
- Accessibility: Properly structured HTML content can be read properly by screen readers and other assistive technologies.
- Maintainability: Clear, valid HTML ensures ease of updating/keeping instead of fixing it.
Validating with Validation Tools:
- W3C Markup Validation Service: This online service will help you check your HTML code for errors as well as web standards. Open W3C Validator and try it with your HTML.
Validating Your HTML
- Type or paste your HTML code into the validator.
- Click the "Check" button to start the validation.
- Go through the errors and warnings that have been reported, doing appropriate fixes.
Interactive Activity:
Validate all the HTML files that you have created so far with the W3C Markup Validation Service. If any issues are reported, fix those issues to make your code error-free and standards compliant.
Quiz Time:
1.10 Best Practices in HTML
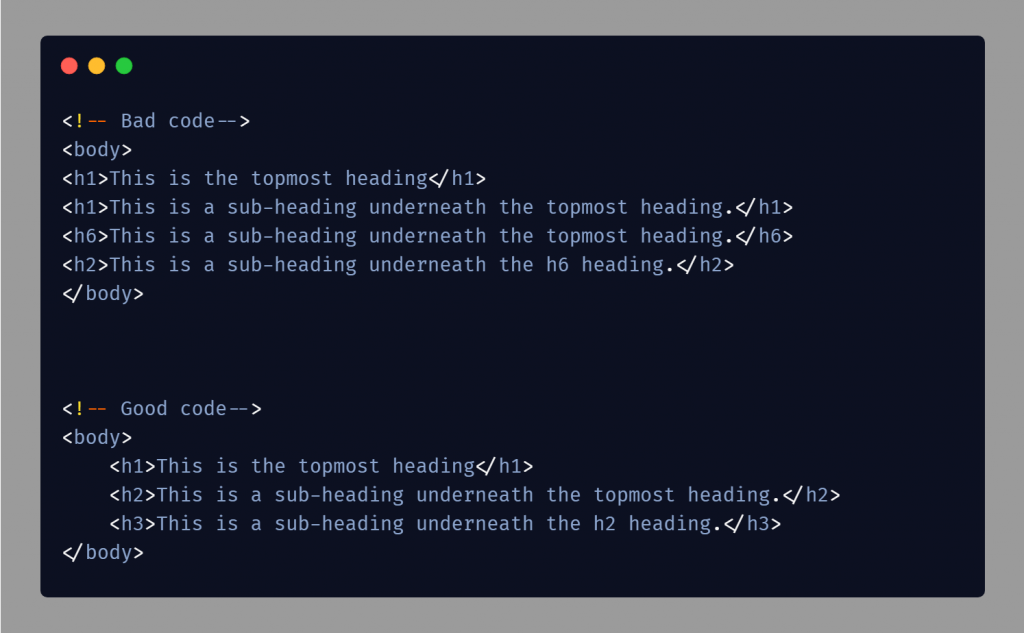
Valid and semantic web pages should follow some best practices while writing your HTML. Good best practices will keep your code clean, maintainable, and accessible.
Best Practices:
- Semantic HTML: Using native HTML elements to provide meaning of the content, like , , , . This would make more readable and accessible to .
- Structure Your Code: Proper indentation of your HTML code and commenting will be making it more readable and maintainable.
- Avoid Obsolete Tags: Instead of using older elements and attributes of HTML, learn about new ones, and avoid the use of those which are obsolete or deprecated. That means using
<section>instead of<div>for sections. - Make Accessible: Your web pages should be made accessible to one and all, mainly the disabled users. Use proper attributes like
altto images and navigate around your content with just the keyboard. - Cross-browser Testing: One has to test web pages on multiple browsers just to be sure that web pages will look and function OK as expected.
Image Reference:
Hands-on Demo:
Refactor one's HTML code by making it well-structured, semantic, creating checkpoints for accessibility, then validating and testing with multiple browsers.